本篇目标
对嵌入式工程师来说,串口调试助手是出厂率最高的自研上位机。本篇从零实现一个功能完整的版本:自动枚举可用串口、下拉选择波特率/数据位/停止位/校验位、一键开关串口、接收区支持 HEX/文本双模式显示、发送区支持 文本/HEX 双模式发送 和 定时发送,状态栏实时显示连接状态与收发字节数。做完它能学到 QSerialPort 的完整用法、信号槽处理异步数据的思路,以及和单片机联调的实战经验。
一、项目目标与界面设计
先明确功能清单:
- 参数配置:串口号(自动枚举)、波特率(9600~115200 常用档)、数据位(7/8)、停止位(1/2)、校验位(无/偶/奇);
- 连接管理:打开/关闭串口一键切换,异常掉线(拔掉 USB 转串口)自动复位界面;
- 接收区:
readyRead信号驱动,HEX 与文本两种显示模式可切换,可选时间戳,显示累计接收字节数; - 发送区:文本或 HEX 两种编码发送,支持定时循环发送(周期可调);
- 状态栏:连接状态、当前串口参数、收发字节计数。
界面布局规划如下:
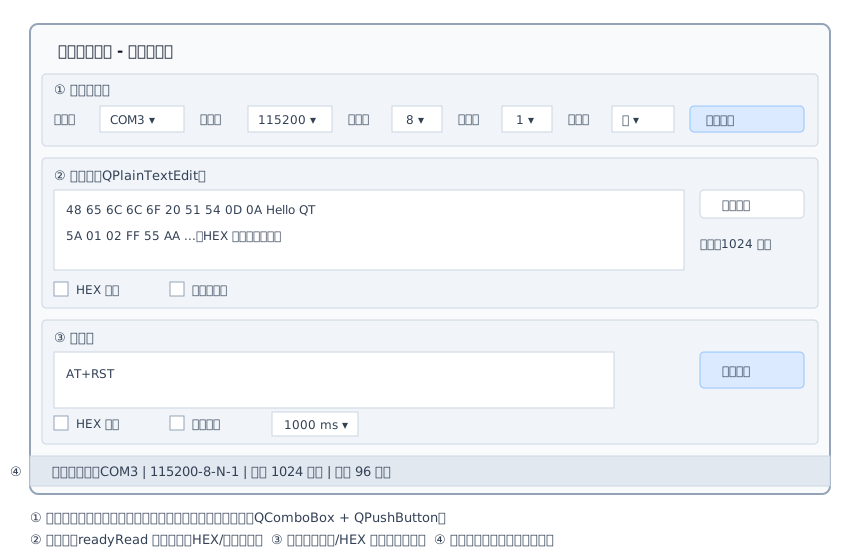
界面分为四块:顶部参数配置区、中部接收区、下部发送区、底部状态栏。控件不多,全部用代码 + 布局器搭建,不依赖 .ui 文件。
二、工程搭建
串口功能在 Qt Serial Port 模块里,需要显式引入。qmake 的 .pro:
# SerialAssistant.pro
QT       += core gui serialport      # 串口模块,Qt5/Qt6 写法相同

greaterThan(QT_MAJOR_VERSION, 4): QT += widgets

CONFIG   += c++17
TEMPLATE  = app
TARGET    = SerialAssistant

SOURCES  += main.cpp mainwindow.cpp
HEADERS  += mainwindow.h
CMake 写法:
cmake_minimum_required(VERSION 3.16)
project(SerialAssistant LANGUAGES CXX)

set(CMAKE_CXX_STANDARD 17)
set(CMAKE_CXX_STANDARD_REQUIRED ON)
set(CMAKE_AUTOMOC ON)

find_package(QT NAMES Qt6 Qt5 REQUIRED COMPONENTS Widgets SerialPort)
find_package(Qt${QT_VERSION_MAJOR} REQUIRED COMPONENTS Widgets SerialPort)

add_executable(SerialAssistant
    main.cpp
    mainwindow.cpp
    mainwindow.h
)
target_link_libraries(SerialAssistant PRIVATE
    Qt${QT_VERSION_MAJOR}::Widgets
    Qt${QT_VERSION_MAJOR}::SerialPort)
找不到 QSerialPort 头文件
Qt6 需要安装 6.2 及以上版本才带 Serial Port 模块(在线安装器的 Additional Libraries 里勾选);Linux 发行版则需要另装开发包,例如 Ubuntu 的
libqt5serialport5-dev。报错QSerialPort: No such file时先检查模块是否装上,再检查.pro/CMake 是否引入。
三、头文件设计
#ifndef MAINWINDOW_H
#define MAINWINDOW_H

#include <QMainWindow>
#include <QSerialPort>
#include <QTimer>

// 前置声明,减少头文件依赖
class QComboBox;
class QPushButton;
class QCheckBox;
class QSpinBox;
class QPlainTextEdit;
class QLabel;

class MainWindow : public QMainWindow
{
    Q_OBJECT

public:
    explicit MainWindow(QWidget *parent = nullptr);
    ~MainWindow() override;

private slots:
    void refreshPorts();      // 重新枚举可用串口
    void toggleSerial();      // 打开/关闭串口(同一个按钮复用)
    void onReadyRead();       // 收到数据(readyRead 信号触发)
    void sendData();          // 发送数据
    void toggleTimerSend(bool checked); // 定时发送开关

private:
    // 界面搭建(每个区域一个函数,避免构造函数臃肿)
    QWidget *buildSerialConfig();  // 参数配置区
    QWidget *buildRecvArea();      // 接收区
    QWidget *buildSendArea();      // 发送区
    void buildStatusBar();         // 状态栏

    // 工具函数
    void appendRecv(const QString &text);  // 向接收区追加一行
    void updateStatusBar();                // 刷新状态栏与按钮文字
    static QString toHexString(const QByteArray &data);   // 字节 -> "48 65 ..."
    static QByteArray fromHexString(const QString &hex);   // "48 65 ..." -> 字节

    // 串口与定时器
    QSerialPort *serial_ = nullptr;
    QTimer *sendTimer_ = nullptr;

    // 参数配置区
    QComboBox *portBox_ = nullptr;
    QComboBox *baudBox_ = nullptr;
    QComboBox *dataBox_ = nullptr;
    QComboBox *stopBox_ = nullptr;
    QComboBox *parityBox_ = nullptr;
    QPushButton *openBtn_ = nullptr;

    // 接收区
    QPlainTextEdit *recvEdit_ = nullptr;
    QCheckBox *hexShowCheck_ = nullptr;
    QCheckBox *timeStampCheck_ = nullptr;
    QPushButton *clearRecvBtn_ = nullptr;

    // 发送区
    QPlainTextEdit *sendEdit_ = nullptr;
    QCheckBox *hexSendCheck_ = nullptr;
    QCheckBox *timerCheck_ = nullptr;
    QSpinBox *intervalSpin_ = nullptr;
    QPushButton *sendBtn_ = nullptr;

    // 状态栏
    QLabel *statusLabel_ = nullptr;
    QLabel *rxLabel_ = nullptr;
    QLabel *txLabel_ = nullptr;
    qint64 rxCount_ = 0;   // 累计接收字节数
    qint64 txCount_ = 0;   // 累计发送字节数
};

#endif // MAINWINDOW_H
设计要点:
- 枚举值直接当
currentData存进 QComboBox(如QSerialPort::EvenParity),发送配置时取出来转一下类型即可,避免一长串 if-else 文本翻译; sendTimer_超时信号直接连sendData(),定时发送就是”每 N 毫秒帮你点一次发送按钮”,不引入第二套发送逻辑;- 收发计数用
qint64,长时间挂机也不会溢出。
四、构造函数与参数配置区
#include "mainwindow.h"

#include <QCheckBox>
#include <QComboBox>
#include <QHBoxLayout>
#include <QLabel>
#include <QMessageBox>
#include <QPlainTextEdit>
#include <QPushButton>
#include <QSerialPortInfo>
#include <QSpinBox>
#include <QStatusBar>
#include <QTextCursor>
#include <QTime>
#include <QVBoxLayout>

MainWindow::MainWindow(QWidget *parent)
    : QMainWindow(parent)
{
    setWindowTitle(tr("串口调试助手"));
    resize(860, 560);

    // 串口对象与定时发送定时器
    serial_ = new QSerialPort(this);
    sendTimer_ = new QTimer(this);
    connect(sendTimer_, &QTimer::timeout, this, &MainWindow::sendData);

    // 组装三个区域 + 状态栏
    auto *central = new QWidget(this);
    auto *layout = new QVBoxLayout(central);
    layout->addWidget(buildSerialConfig());
    layout->addWidget(buildRecvArea(), 1);   // stretch=1,接收区可拉伸
    layout->addWidget(buildSendArea(), 1);
    setCentralWidget(central);
    buildStatusBar();

    // 信号槽:串口数据到达 / 串口异常 / 界面交互
    connect(serial_, &QSerialPort::readyRead, this, &MainWindow::onReadyRead);
    connect(serial_, &QSerialPort::errorOccurred, this, &MainWindow::onSerialError);
    connect(openBtn_, &QPushButton::clicked, this, &MainWindow::toggleSerial);
    connect(sendBtn_, &QPushButton::clicked, this, &MainWindow::sendData);
    connect(clearRecvBtn_, &QPushButton::clicked, recvEdit_, &QPlainTextEdit::clear);
    connect(timerCheck_, &QCheckBox::toggled, this, &MainWindow::toggleTimerSend);

    refreshPorts();      // 启动时枚举一次串口
    updateStatusBar();
}

MainWindow::~MainWindow()
{
    if (serial_->isOpen())
        serial_->close();   // 退出前关闭串口,把资源还给系统
}

QWidget *MainWindow::buildSerialConfig()
{
    auto *group = new QWidget(this);
    auto *layout = new QHBoxLayout(group);
    layout->setContentsMargins(8, 8, 8, 8);

    // 各参数下拉框:把 QSerialPort 枚举值直接作为 itemData 存起来
    portBox_ = new QComboBox(group);

    baudBox_ = new QComboBox(group);
    const QList<qint32> bauds { 9600, 19200, 38400, 57600, 115200, 230400, 460800, 921600 };
    for (qint32 b : bauds)
        baudBox_->addItem(QString::number(b), b);
    baudBox_->setCurrentText(QStringLiteral("115200"));   // 默认最常用档位

    dataBox_ = new QComboBox(group);
    dataBox_->addItem(QStringLiteral("8"), QSerialPort::Data8);
    dataBox_->addItem(QStringLiteral("7"), QSerialPort::Data7);
    dataBox_->setCurrentIndex(0);

    stopBox_ = new QComboBox(group);
    stopBox_->addItem(QStringLiteral("1"), QSerialPort::OneStop);
    stopBox_->addItem(QStringLiteral("2"), QSerialPort::TwoStop);
    stopBox_->setCurrentIndex(0);

    parityBox_ = new QComboBox(group);
    parityBox_->addItem(tr("无"), QSerialPort::NoParity);
    parityBox_->addItem(tr("偶"), QSerialPort::EvenParity);
    parityBox_->addItem(tr("奇"), QSerialPort::OddParity);
    parityBox_->setCurrentIndex(0);

    openBtn_ = new QPushButton(tr("打开串口"), group);

    // 一行排开:标签 + 下拉框 + 打开按钮
    auto addPair = [&layout](const QString &text, QWidget *w) {
        layout->addWidget(new QLabel(text, w->parentWidget()));
        layout->addWidget(w);
    };
    addPair(tr("串口号"), portBox_);
    addPair(tr("波特率"), baudBox_);
    addPair(tr("数据位"), dataBox_);
    addPair(tr("停止位"), stopBox_);
    addPair(tr("校验位"), parityBox_);
    layout->addWidget(openBtn_);
    layout->addStretch(1);   // 剩余空白推到右侧

    return group;
}
说明:
addItem(文字, 数据)的第二个参数通过currentData()取回,参数配置到串口时一行代码完成映射,这是本篇最推荐的小技巧;- 波特率默认 115200,这是现代单片机(尤其带 DMA 的 HAL 库工程)最常用的档位,减少每次打开都要改一遍的麻烦;
- 界面拆成
buildXxx()三个小函数,构造函数只剩”组装 + 连信号”,可读性远比几百行塞在一起好。
五、接收区与发送区
QWidget *MainWindow::buildRecvArea()
{
    auto *group = new QWidget(this);
    auto *layout = new QVBoxLayout(group);

    // 标题行:接收区 + HEX 显示 + 时间戳 + 计数 + 清空按钮
    auto *topRow = new QHBoxLayout;
    hexShowCheck_ = new QCheckBox(tr("HEX 显示"), group);
    timeStampCheck_ = new QCheckBox(tr("显示时间戳"), group);
    clearRecvBtn_ = new QPushButton(tr("清空"), group);
    topRow->addWidget(new QLabel(tr("接收区"), group));
    topRow->addWidget(hexShowCheck_);
    topRow->addWidget(timeStampCheck_);
    topRow->addStretch(1);
    topRow->addWidget(clearRecvBtn_);
    layout->addLayout(topRow);

    // 接收文本框:只读,随便复制
    recvEdit_ = new QPlainTextEdit(group);
    recvEdit_->setReadOnly(true);
    layout->addWidget(recvEdit_, 1);

    return group;
}

QWidget *MainWindow::buildSendArea()
{
    auto *group = new QWidget(this);
    auto *layout = new QVBoxLayout(group);

    auto *topRow = new QHBoxLayout;
    hexSendCheck_ = new QCheckBox(tr("HEX 发送"), group);
    timerCheck_ = new QCheckBox(tr("定时发送"), group);
    intervalSpin_ = new QSpinBox(group);
    intervalSpin_->setRange(10, 60000);   // 10ms ~ 60s
    intervalSpin_->setValue(1000);
    intervalSpin_->setSuffix(tr(" ms"));
    topRow->addWidget(new QLabel(tr("发送区"), group));
    topRow->addWidget(hexSendCheck_);
    topRow->addWidget(timerCheck_);
    topRow->addWidget(intervalSpin_);
    topRow->addStretch(1);
    layout->addLayout(topRow);

    sendEdit_ = new QPlainTextEdit(group);
    sendEdit_->setPlaceholderText(tr("输入要发送的内容,HEX 模式下请写 \"01 A0 FF\" 这样的十六进制串"));
    layout->addWidget(sendEdit_, 1);

    sendBtn_ = new QPushButton(tr("发送"), group);
    layout->addWidget(sendBtn_);

    return group;
}

void MainWindow::buildStatusBar()
{
    statusLabel_ = new QLabel(this);
    rxLabel_ = new QLabel(this);
    txLabel_ = new QLabel(this);
    statusBar()->addWidget(statusLabel_, 1);  // stretch=1,占满剩余宽度
    statusBar()->addPermanentWidget(rxLabel_);
    statusBar()->addPermanentWidget(txLabel_);
}
两个细节:
- 接收框
setReadOnly(true)但不禁止选择复制——调试时经常要把报文贴进文档,只读编辑器正好满足”能看能抄不能改”; - 状态栏分两组:
addWidget放的消息会被showMessage()暂时顶掉,addPermanentWidget放的收发计数永远可见,各司其职。
六、枚举可用串口
void MainWindow::refreshPorts()
{
    const QString lastPort = portBox_->currentText();   // 记住当前选择
    portBox_->clear();

    // QSerialPortInfo 扫描系统里所有可用串口
    const auto ports = QSerialPortInfo::availablePorts();
    for (const QSerialPortInfo &info : ports) {
        // 显示 "COM3(CH340)" 这样带硬件描述的条目,数据仍存纯端口名
        const QString desc = info.description();
        const QString text = desc.isEmpty()
                                 ? info.portName()
                                 : QStringLiteral("%1(%2)").arg(info.portName(), desc);
        portBox_->addItem(text, info.portName());
    }

    // 尽量恢复之前的选择
    const int idx = portBox_->findData(lastPort);
    if (idx >= 0)
        portBox_->setCurrentIndex(idx);
}
说明:
QSerialPortInfo::availablePorts()返回系统当前所有串口(Windows 上是 COMx,Linux 上是 ttyUSB0/ttyACM0 等);- 显示描述、存储端口名:CH340、CP2102 这类 USB 转串口芯片的描述能帮你一眼认出哪根线是单片机;
- 界面上可以再加一个”刷新”按钮连接到
refreshPorts();更优雅的做法是定时器每秒枚举一次,让拔插串口自动反映到列表里。
串口被占用
如果打开串口报
PermissionError(Linux)或打开后收发无反应,第一反应应该是:是不是被别的程序占了? 串口是独占资源,Arduino IDE 的串口监视器、另一个调试助手、甚至还没关干净的上一次运行实例,都会把口占住。Windows 上可以用设备管理器确认端口号,Linux 上用lsof /dev/ttyUSB0查占用进程。
七、打开与关闭串口
void MainWindow::toggleSerial()
{
    if (serial_->isOpen()) {
        // ---- 关闭分支 ----
        sendTimer_->stop();
        timerCheck_->setChecked(false);
        serial_->close();
        updateStatusBar();
        return;
    }

    // ---- 打开分支:把界面上的参数逐项写入 QSerialPort ----
    serial_->setPortName(portBox_->currentData().toString());

    bool ok = false;
    serial_->setBaudRate(baudBox_->currentData().toInt(&ok));

    serial_->setDataBits(static_cast<QSerialPort::DataBits>(dataBox_->currentData().toInt()));
    serial_->setStopBits(static_cast<QSerialPort::StopBits>(stopBox_->currentData().toInt()));
    serial_->setParity(static_cast<QSerialPort::Parity>(parityBox_->currentData().toInt()));
    serial_->setFlowControl(QSerialPort::NoFlowControl);   // 普通调试线不接流控线

    if (!serial_->open(QIODevice::ReadWrite)) {
        QMessageBox::critical(this, tr("错误"),
                              tr("打开串口失败:%1").arg(serial_->errorString()));
        return;
    }

    // 打开成功:锁定参数区,防止运行中误改
    for (QComboBox *box : { portBox_, baudBox_, dataBox_, stopBox_, parityBox_ })
        box->setEnabled(false);
    updateStatusBar();
}

void MainWindow::updateStatusBar()
{
    const bool open = serial_->isOpen();

    openBtn_->setText(open ? tr("关闭串口") : tr("打开串口"));
    if (open) {
        statusLabel_->setText(tr("串口已打开:%1")
                                  .arg(serial_->portName()));
    } else {
        statusLabel_->setText(tr("串口已关闭"));
        for (QComboBox *box : { portBox_, baudBox_, dataBox_, stopBox_, parityBox_ })
            box->setEnabled(true);
    }
    rxLabel_->setText(tr("接收:%1 字节").arg(rxCount_));
    txLabel_->setText(tr("发送:%1 字节").arg(txCount_));
}